Low-Glycemic Index Bread for Diabetics
Discover how to bake delicious, wholesome low-glycemic index bread at home, perfect for diabetics managing blood sugar without sacrificing taste. Get the easy recipe for a healthy, fiber-rich loaf that supports stable glucose levels and fits beautifully into a balanced diet.
Navigating dietary choices when managing diabetes can often feel like walking a tightrope, especially when it comes to beloved staples like bread. The conventional loaves we grew up with often send blood sugar levels soaring, leaving many feeling deprived. But what if I told you that you don’t have to give up the comforting aroma and satisfying texture of fresh, homemade bread? As Sarah Baker, I’m thrilled to share a revolutionary recipe that brings the joy of bread back to your table: a delicious, wholesome Low-Glycemic Index Bread specifically crafted for diabetics. This isn’t just bread; it’s a testament to how intelligent ingredient choices can transform a simple food into a powerful ally for stable blood sugar and vibrant health.
Low-Glycemic Index Bread for Diabetics
Ingredients
Instructions
- Activate Yeast: In a large bowl, combine warm water, yeast, and sugar substitute (if using). Let sit for 5-10 minutes until foamy.
- Combine Wet & Dry: Stir in olive oil and salt into the yeast mixture. In a separate bowl, whisk together whole wheat flour, oat flour, vital wheat gluten, ground flaxseed meal, chia seeds, and psyllium husk powder.
- Form Dough: Gradually add the dry ingredients to the wet ingredients, mixing with a wooden spoon until a shaggy dough forms. Turn out onto a lightly floured surface and knead for 8-10 minutes until smooth and elastic. The dough will be slightly sticky due to high fiber content.
- First Rise: Lightly grease a large bowl with olive oil. Place the dough in the bowl, turning once to coat. Cover with a clean kitchen towel or plastic wrap and let rise in a warm place for 60-90 minutes, or until doubled in size.
- Shape Loaf & Second Rise: Gently punch down the dough. On a lightly floured surface, shape it into a loaf. Place the loaf into a lightly greased 9x5 inch loaf pan. If desired, sprinkle the top with sunflower seeds. Cover and let rise again for 30-45 minutes, or until nearly doubled.
- Bake Bread: Preheat oven to 375°F (190°C). Bake for 40-45 minutes, or until the crust is golden brown and the internal temperature reaches 200-210°F (93-99°C). If the top browns too quickly, tent loosely with foil.
- Cool & Serve: Remove bread from the pan immediately and transfer to a wire rack to cool completely before slicing. This is crucial for the texture. Enjoy your homemade low-GI bread!
Why Low-Glycemic Index Matters for Diabetics
For individuals with diabetes, understanding the glycemic index (GI) is paramount. The GI is a rating system for foods containing carbohydrates. It shows how quickly each food affects your blood sugar (glucose) level when that food is eaten on its own. Foods with a high GI are rapidly digested and absorbed, leading to a quick and dramatic rise in blood sugar. Conversely, low-GI foods are broken down slowly, causing a gradual and sustained release of glucose into the bloodstream, which is crucial for maintaining stable blood sugar levels. Our Low-Glycemic Index Bread is engineered with this principle in mind, offering a healthier carbohydrate choice that supports long-term health and better glucose management.
Key Ingredients for a Healthier Loaf
Crafting a truly low-GI bread requires thoughtful selection of ingredients. It’s about maximizing fiber, using complex carbohydrates, and minimizing rapidly digestible starches and sugars.
Whole Grains
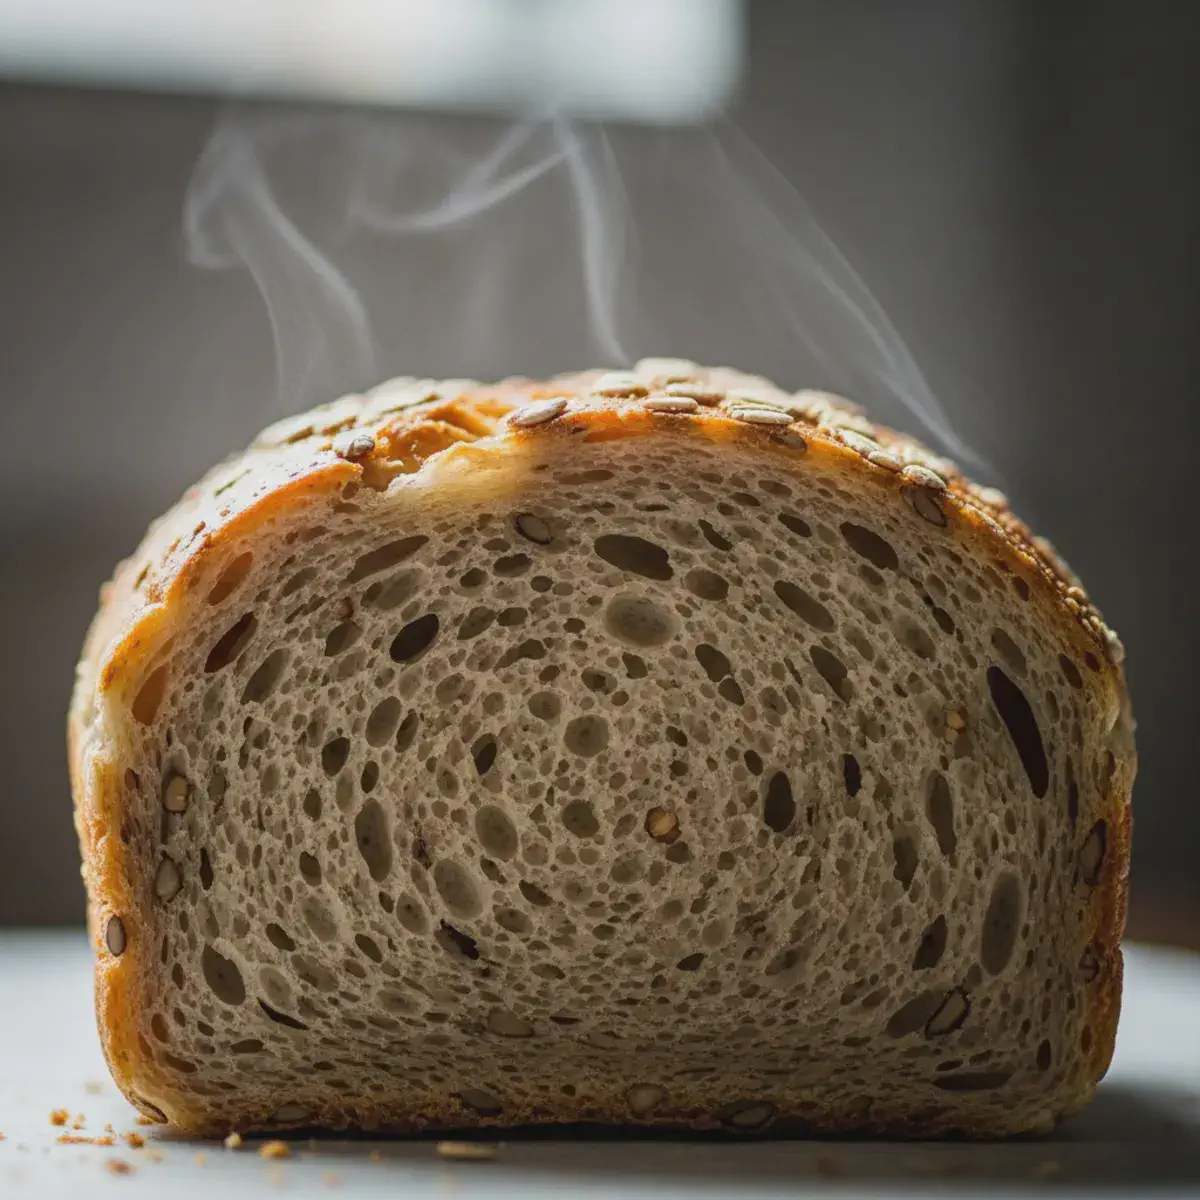
We lean heavily on whole wheat flour and oat flour. Unlike refined white flour, which has been stripped of its bran and germ (and thus, most of its fiber and nutrients), whole grain flours retain these components. The fiber in whole grains acts as a natural barrier, slowing down the conversion of starches into glucose.
Seeds and Fiber Boosters
This recipe is packed with powerhouses like ground flaxseed meal, chia seeds, and psyllium husk powder.
- Psyllium husk is a soluble fiber that absorbs water, forming a gel-like substance in the digestive tract. This not only aids in digestion but significantly slows down sugar absorption.
- Flaxseeds and chia seeds are rich in soluble and insoluble fiber, healthy fats (omega-3s), and protein, all of which contribute to a lower GI response and increased satiety.

The Science Behind Low-GI Baking
Beyond just using low-GI ingredients, the structure of this bread is also optimized. We use vital wheat gluten, which is crucial when working with high-fiber flours and a large proportion of seeds. It provides the necessary elasticity and structure that whole grain flours often lack, ensuring a light, airy crumb without compromising the low-GI profile. This thoughtful combination of ingredients ensures a bread that’s not only good for you but also genuinely delicious and satisfying.
Secret Chef Tips
- Don’t Rush the Rise: Given the high fiber and seed content, this dough might take a little longer to rise than conventional white bread. Be patient and ensure your rising environment is warm enough.
- Accurate Measurements: Especially for ingredients like psyllium husk and vital wheat gluten, precise measurements are key to the final texture and success of the loaf.
- Cool Completely: Always allow your bread to cool completely on a wire rack before slicing. Slicing warm bread can lead to a gummy texture, especially with whole grain loaves. Cooling allows the starches to set.
- Customize with Care: While you can add other low-GI seeds like sesame or pumpkin, avoid high-sugar dried fruits or large amounts of root vegetables that could increase the GI.
- The Tap Test: To check if your bread is done, gently tap the bottom of the loaf. It should sound hollow. An internal temperature of 200-210°F (93-99°C) confirms it’s baked through.

Baking Your Low-Glycemic Masterpiece: A Step-by-Step Guide
Creating this health-conscious loaf is a rewarding experience. Follow these detailed steps to ensure a perfect bake every time.
1. Activate Yeast
In your largest mixing bowl, combine the specified amount of warm water, yeast, and a small amount of sugar substitute if you’re using it to help the yeast get a head start. Let this mixture sit for 5 to 10 minutes. You’re looking for a foamy surface, which indicates your yeast is active and ready to work.
2. Combine Wet & Dry
Once your yeast is bubbling, stir in the olive oil and salt. In a separate, medium-sized bowl, thoroughly whisk together all your dry ingredients: whole wheat flour, oat flour, vital wheat gluten, ground flaxseed meal, chia seeds, and psyllium husk powder. Whisking ensures an even distribution of these crucial ingredients.
3. Form Dough
Gradually add the dry mixture to the wet ingredients, mixing with a sturdy wooden spoon or a dough whisk until a shaggy, somewhat sticky dough forms. Turn the dough out onto a lightly floured surface. Now comes the kneading! Knead for 8 to 10 minutes. This develops the gluten, especially important with the high-fiber flours. The dough should become smoother and more elastic, though it will remain slightly sticky due to the psyllium and seeds.
4. First Rise
Lightly grease a clean large bowl with a little olive oil. Place your kneaded dough into the bowl, turning it once to coat the entire surface with oil. Cover the bowl with a clean kitchen towel or plastic wrap. Find a warm, draft-free spot in your kitchen and let the dough rise for 60 to 90 minutes, or until it has roughly doubled in size. Patience is key here for a good crumb!
5. Shape Loaf & Second Rise
Gently “punch down” the risen dough to release the air. Transfer it back to your lightly floured surface. Shape the dough into a cohesive loaf that will fit your 9x5 inch loaf pan. Lightly grease the loaf pan and carefully place the shaped dough inside. If you’d like, sprinkle the top with sunflower seeds for extra texture and visual appeal. Cover the pan again and let it rise for a second time, for about 30 to 45 minutes, or until it looks nearly doubled again.
6. Bake Bread
While your loaf is enjoying its second rise, preheat your oven to 375°F (190°C). Once the oven is hot and the bread has risen, place the loaf pan into the preheated oven. Bake for 40 to 45 minutes. The crust should be a beautiful golden brown. To confirm doneness, an instant-read thermometer inserted into the center of the loaf should read between 200-210°F (93-99°C). If the top seems to be browning too quickly, you can loosely tent it with aluminum foil for the remaining bake time.
7. Cool & Serve
This step is critical for optimal texture! As soon as the bread comes out of the oven, remove it from the loaf pan and transfer it to a wire rack. Allow it to cool completely before attempting to slice it. This can take 1-2 hours. Cooling allows the internal structure of the bread to stabilize. Once fully cooled, slice and enjoy your incredibly healthy and delicious homemade low-GI bread!
Frequently Asked Questions
What role does vital wheat gluten play in this recipe?
Vital wheat gluten is a crucial ingredient in this low-GI bread because it’s a concentrated form of wheat protein. When baking with high-fiber flours, seeds, and ingredients like psyllium husk, the natural gluten structure can be compromised, leading to a dense, heavy loaf. Vital wheat gluten enhances the elasticity and strength of the dough, allowing it to trap gases produced by the yeast more effectively, resulting in a lighter, more voluminous, and pleasantly chewy bread texture despite its nutrient-dense composition.
Can I make this bread in a bread machine?
Yes, with some adjustments, this recipe can be adapted for a bread machine. You would typically add the wet ingredients first, followed by the dry ingredients. Place the yeast last, usually in a separate dispenser or on top of the flour. Use the “Whole Wheat” or “Basic” cycle, or a cycle suitable for denser loaves, and monitor the dough during the mixing phase to adjust hydration if needed (it might be slightly stiffer than regular bread machine dough). Ensure your machine can handle a dough of this density.
How does this bread compare to store-bought “diabetic” breads?
While some store-bought breads are marketed for diabetics, they often contain added sugars, processed ingredients, or a higher proportion of refined flours. This homemade low-GI bread provides superior nutritional benefits due to its emphasis on whole, unprocessed ingredients, high fiber content from multiple sources, and complete control over any added sweeteners. You get a fresher, more nutrient-dense loaf with a genuinely low-glycemic impact, free from hidden additives.
Can I add nuts to this bread?
Yes, you can absolutely add nuts to this low-GI bread for extra flavor, texture, and healthy fats. Good options include chopped walnuts, pecans, or almonds. Incorporate about ½ cup of chopped nuts during the kneading phase, or with the dry ingredients, to ensure they are evenly distributed throughout the dough. Nuts also contribute to the bread’s healthy fat and protein content, further supporting a stable blood sugar response.
Baking your own bread is not just an act of culinary creation; it’s a step towards greater control over your health and well-being. This Low-Glycemic Index Bread for Diabetics is more than just a recipe; it’s an invitation to enjoy the simple pleasures of life, one wholesome, blood-sugar-friendly slice at a time. Embrace the warmth of your kitchen and the satisfaction of knowing you’re nourishing your body with every bite. Happy baking!
Warmly, Sarah Baker World-Class SEO Food Writer
Low-Glycemic Index Bread for Diabetics
Ingredients
Instructions
- Activate Yeast: In a large bowl, combine warm water, yeast, and sugar substitute (if using). Let sit for 5-10 minutes until foamy.
- Combine Wet & Dry: Stir in olive oil and salt into the yeast mixture. In a separate bowl, whisk together whole wheat flour, oat flour, vital wheat gluten, ground flaxseed meal, chia seeds, and psyllium husk powder.
- Form Dough: Gradually add the dry ingredients to the wet ingredients, mixing with a wooden spoon until a shaggy dough forms. Turn out onto a lightly floured surface and knead for 8-10 minutes until smooth and elastic. The dough will be slightly sticky due to high fiber content.
- First Rise: Lightly grease a large bowl with olive oil. Place the dough in the bowl, turning once to coat. Cover with a clean kitchen towel or plastic wrap and let rise in a warm place for 60-90 minutes, or until doubled in size.
- Shape Loaf & Second Rise: Gently punch down the dough. On a lightly floured surface, shape it into a loaf. Place the loaf into a lightly greased 9x5 inch loaf pan. If desired, sprinkle the top with sunflower seeds. Cover and let rise again for 30-45 minutes, or until nearly doubled.
- Bake Bread: Preheat oven to 375°F (190°C). Bake for 40-45 minutes, or until the crust is golden brown and the internal temperature reaches 200-210°F (93-99°C). If the top browns too quickly, tent loosely with foil.
- Cool & Serve: Remove bread from the pan immediately and transfer to a wire rack to cool completely before slicing. This is crucial for the texture. Enjoy your homemade low-GI bread!
Nutrition
Calories: 180 kcal | Protein: 7g | Fat: 5g | Sugar: 1g