The Science of Perfect Banana Bread: 5 Mistakes Ruining Your Loaf

Stop baking dry, dense loaves. Culinary Scientist Sarah Baker reveals the 5 critical errors to avoid and the secret ingredient for the moistest banana bread ever.
We have all experienced the specific heartbreak of slicing into a golden-brown loaf, anticipating a melt-in-your-mouth bite, only to be met with a texture akin to dry sawdust or a gummy rubber brick. As a culinary scientist, I can tell you that banana bread is deceptively simple. It is a “quick bread,” meaning it relies on chemical leavening rather than yeast, but the chemistry involved is unforgiving.
The difference between a mediocre loaf and a bakery-style masterpiece usually boils down to five specific technical errors. Today, we aren’t just baking; we are engineering the perfect crumb structure. Let’s dismantle the myths and look at the science of moisture retention.
The Physics of Crumb Structure: Avoiding the Brick Effect
The most fatal error home bakers make is overworking the gluten network. Wheat flour contains two proteins, gliadin and glutenin. When you add water (or moisture from bananas) and apply kinetic energy (mixing), these proteins bond to form gluten.
In a baguette, you want strong gluten. In banana bread, gluten is the enemy of tenderness.
If you use an electric mixer or beat the batter aggressively once the flour is added, you create a tough, rubbery lattice. The result? A loaf that is dense and dry, regardless of how much butter you add. The scientific fix is the “Fold Method.” You want to mix the dry ingredients into the wet only until the flour just disappears. If you see lumps, leave them. Lumps are pockets of tenderness waiting to happen.
The Chemistry of Ratios: Why Your Bananas Are Lying to You
The second massive mistake lies in the state of your fruit. To a botanist, a yellow banana is starch. To a baker, a black banana is sugar and liquid.
If you bake with yellow or barely spotted bananas, you are introducing starch molecules that absorb moisture from your batter, drying it out as it bakes. You need the enzymatic process to fully convert those starches into fructose and glucose.
Furthermore, the “Fat Debate” often trips people up.
- Butter: Provides flavor and aeration but contains 15-20% water, which evaporates.
- Oil: Is 100% fat and remains liquid at room temperature, creating a sensation of moistness.
The Solution: I use a hybrid approach or rely on emulsification. By using melted butter for flavor and adding a secret fat-protein binder (which I will reveal in the recipe below), we get the best of both worlds.
Diagnostic Lab: Why Your Bake Failed
If you have ever pulled a loaf out of the oven that looked perfect but failed upon inspection, consult this troubleshooting matrix. Baking is chemistry; every reaction has a cause.
| The Clinical Issue | The Scientific Culprit | The Immediate Fix |
|---|---|---|
| The “Sad Valley” (Sunken Center) | Under-baking or Opening the oven door too early. | Do not open the oven door until 45 minutes have passed. Check internal temp reaches 200°F (93°C). |
| The “Sawdust” Crumb (Dry) | Excess Flour (Gluten overload) or Low Sugar. | Weigh your flour (125g per cup). Scoop-and-sweep packs 150g+, drying out the loaf. |
| The “Gummy Bottom” | “Wet Streak” caused by poor heat distribution or old baking soda. | Ensure your oven is fully preheated. Check baking soda expiration; it loses potency after 6 months. |
| The Burnt Crust / Raw Center | Sugar caramelization happening too fast (Maillard reaction). | Tent the loaf with aluminum foil at the 30-minute mark to deflect direct heat while the center cooks. |
Sarah’s Secret Vault: Elevating the Humble Loaf
You now have the recipe and the science, but here are the nuanced techniques that separate the pros from the amateurs.
1. The “Acid Hack” (My Secret Ingredient) You noticed I added Greek Yogurt (or sour cream) to the recipe. This is non-negotiable for a “wow” factor. The acidity in the yogurt reacts with the baking soda more aggressively than bananas alone, creating a superior lift. More importantly, the protein structure of the yogurt holds water molecules, preventing them from evaporating during the bake. This guarantees a moist loaf three days later.
2. The Thermal Shock Rule Never put cold eggs into warm melted butter. It causes the butter to re-solidify into tiny chunks, breaking your emulsion. Ensure your egg and yogurt are at room temperature so they integrate seamlessly into the batter.
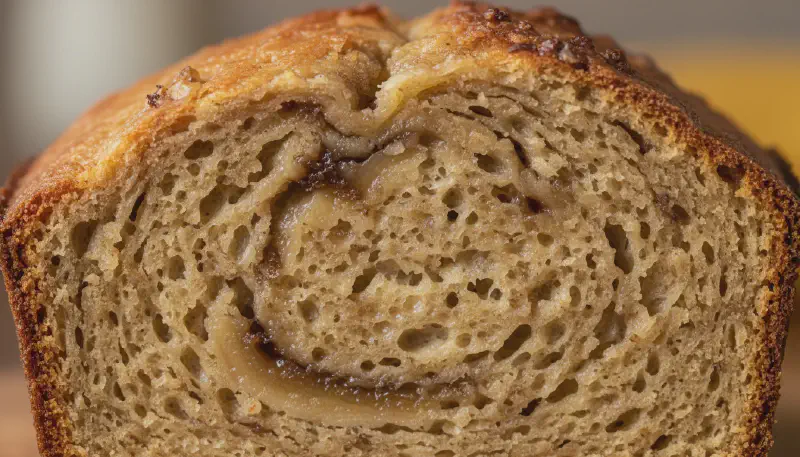
3. The Mashing Technique
Look at the image below. Notice the texture?
By avoiding these five mistakes—overmixing, under-ripe fruit, wrong flour measurement, temperature shock, and skipping the acidic element—you are no longer just baking; you are mastering the culinary science of the perfect loaf.
The Science of Perfect Banana Bread: 5 Mistakes Ruining Your Loaf
Ingredients
Instructions
- The Chemical Prep: Preheat your oven to 350°F (175°C). Grease a 9x5-inch loaf pan with butter or non-stick spray. Peel the bananas and mash them in a large bowl until they resemble a chunky puree—do not puree until completely smooth; texture matters.
- Emulsification: Stir the melted butter into the mashed bananas. Whisk in the sugar, egg, vanilla, and Greek yogurt until the mixture is uniform. This acidic element (yogurt) activates the baking soda later.
- Dry Integration: Sprinkle the baking soda and salt over the wet mixture and whisk to combine. Gently fold in the flour using a spatula. STOP mixing the moment the last streak of flour disappears. Lumps are your friend here.
- The Bake: Pour the batter into your prepared loaf pan. Bake for 55–60 minutes. A toothpick inserted into the center should come out clean or with a few moist crumbs, but never wet batter.
- Setting the Crumb: Remove from the oven and let it cool in the pan for exactly 10 minutes. Then, transfer to a wire rack to cool completely before slicing. Cutting too early releases steam and dries out the loaf.
Nutrition
Calories: 295 kcal | Protein: 4g | Fat: 11g | Sugar: 24g